Tuesday, November 8, 2011

Shruti's Sewing Space

I am aware that I have been neglecting this blog for a long time now! But I'm back now... And the first sewing room that I'm showing you guys is my own!


I just finished re-doing it and I'm loving it. The only thing I'm not loving is that it does not have the quality of light that my earlier sewing room had...

Here's a tour for you guys...

This is what you see when you enter the sewing room. Its right next to my living room. So it makes it easy for me to stay connected to the house!

Right in front of me is my pin-up wall with all the mini quilts and stuff I have received in swaps. The small knitted sweater is one made by my grandmother when I was pregnant with Aadi. (she passed away in the 6th month of my pregnancy and never could see Aadi wearing it) I keep my computer facing that wall. Don't you all agree that I should upgrade to a Laptop, especially since DH runs a Laptop Shop?

On the left, facing the window is my cutting and sewing table. In the corner I have a rack for all my "up"cycle stuff. My scraps are all sorted into bins and kept under my cutting table.

This door leads to Aadi's room! So I'm right next to him as I work - that makes me a happy mom!


This is the wall that is to the right of my computer wall. The book rack holds all my books, patterns, notebooks and my Harry Potter books! The table holds my smaller table with baskets below and above it and also my tiny scrap jars...  I'll be using the remaining table for ironing... 


This is the detail of the stuff on my small table... First - to the back are my tiny scrap jars sorted into - yellows-oranges, reds-pinks-lavs, blacks-whites, browns-beiges & blues-green. Then the three baskets hold (from right to left) Sewing Machine Stuff, Cutting instruments and hand sewing stuff... Under the table (from right to left) zippers, misc stuff and craft stuff (punches and tapes)


This is my cutting table along with my fabric storage. This is the fabric that I use most of the time. My batting and rarely used fabric is in the overhead cupboard - sorted in boxes.


Thats my thread rack along with the charpai stools I had made for my living room! And thats the door to the living room...


Here's my fabric stack once again! I just love how yummy it looks!


My room has evolved over the last two years and by no means is it going to remain this way for ever... But for now, it works! 

Cheers!!!

Tuesday, July 26, 2011

Melissa's Woman Cave

Today's guest is Melissa. I came across her blog recently and asked he4r if she would like to blog here... I'm so glad that she agreed... Not only she has an organized sewing room, but she has annotated the images so that we can know better...
Thank you Melissa, for this wonderful post!


Hi! My name is Melissa and I blog over at Love Affair with My Brother. 
I started designing my sewing room when my hubby and I decided to buy a new home, we got to pick out everything in our house and I figured if my husband was going to have a garage (a.k.a. the Man Cave), which will hopefully be the home of his woodworking room at some point, I needed my own space too – thus the Woman Cave was born.
We got to pick everything for our house and we had the option of having an open formal dining room, a den or a guest bedroom in the downstairs of our home. I decided that for my Woman Cave the den would fit my needs best. For two reasons: 1. I loved the idea of French Doors and 2. I liked the idea of no closet (you’ll see why later).
Here is the open view of my sewing room:


I love this room and spend almost every nap time in here (when I’m not folding laundry or washing dishes!).
We will start in one corner and work our way around.
Our first step is where all the magic happens, my sewing table:


This is a multifunction table because I do all my cutting and sewing here. Eventually I would like to get a high cutting table too, but for now I just don’t have the space (hard to believe isn’t it!).  I have my GO! Cutter, both my machines (a serger is next), and my trusty sewing companion to keep me company.  I love this set up because everything I need is within arm’s length reach.
Next is my Yarn Storage and Books:


The shelf holding all my yarn is a repurposed shelving unit from Ikea, once we got it home and built we decided it wasn’t a good fit for its original purpose – but it was the PERFECT fit for all of my yarn.  I didn’t have enough wicker baskets so I made the fabric ones that you see underneath.  My bookshelf is a mishmash of things. I have my photography gear, all my crafting books and more back issues of knitting magazines than I care to admit!
Next stop is my inspiration windows and ironing area:


I don’t think there is anything more important in a sewing space than natural lighting; I have a huge window at the front of my room and these three along the wall.  I keep them uncovered and chock full of photos of all my loves – they are my inspiration.  My ironing board will one day be replaced by a cutting table (hopefully) and the board will be stored flat when not in use.
I have my computer and design center in the next corner: 


This is actually my least favorite part of the space and I hope that one day I will be able to take it out of the room but until my toddler learns that we don’t yank on every cord we see it is going to have to live here.  I really need to pretty it up some to make it more inspirational…but I don’t think that is going to happen any time soon.
Finally we have my storage cabinet. I mentioned earlier that I didn’t want a closet, which you maybe thought was completely NUTS. Well I do have my reasons, which I will share with you. I really wanted to be able to see my stash and not be able to hide anything. I have a very bad habit of tossing a project that is frustrating me into a box or into the closet and “forgetting” it is there. This holds me accountable:


You can’t hide anything when you have clear glass doors and all of your projects are staring you in the face. It also forced me to come up with a creative way to organize my fabrics so that it wouldn’t look like an absolute disaster in there – thus the ROYGBIV Bins were born!
That’s it, that’s my sewing space!  What do you think? Any ideas for my ugly computer area?
Thanks for letting me guest post today!


Sunday, July 10, 2011

Sandie's Studio

I'm revisitng my old series for a few of the selected posts that I'd like our new readers to have a look at... Some of the old spaces have undergone a lot of changes and the guests are posting about them again, soon...

Till then we'll revisit some of my favorite ones...


Today's guest is Sandie Holtman better known as Samilou to the Flickrland... She also blogs at the Sleepy Owl Studio... And have a look at her studio, its far from Sleepy... 

Cheers!!! 


"After many years of sewing at the dining room table (and even couple years when the dining room was ONLY a sewing room), I was thrilled to have a room of my own. It's small, but it's packed with storage, and I love every inch of it. It's a west-facing room, with lots of light and a great view. The color I chose might not be for everyone, but it never fails to make me happy, even in the long, grey days of winter.

Despite being a little obsessed with organization, and keeping most of the rest of my home fairly clutter-free, I realized when I was designing the layout for this room that I wanted the things I used every day to be within reach. A place for everything, certainly, but I didn't want to waste time digging for notions and tools. So one of the features of my room is my wall grid system. This is a VERY inexpensive system, sold by The Container Store. Seriously - it is not the high-end system you might be familiar with. The grids themselves are under $20 each, and the hooks, shelves and baskets are equally reasonable. Everything is within reach, and clean-up is a snap.


I'm lucky to have a lot of drawers in my room, and I have them organized by type of notions (threads, ironing supplies, embroidery supplies, etc.), so it's quick and easy to find the things I use less often. The thread below is sorted by color, and the bins stack in the drawer. When I'm working on an embroidery project, I can grab the bins I need and take them to the machine for easy color selection.


The most recent storage solution I found is this stacking box. At first I wasn't sure how well it would work, and I only bought a small 2-bin stack to start with. I just added 3 more bins to it, and here's why: I've always keep a small box or bin next to my sewing machine for the everyday tools (stiletto, seam ripper, pins, etc.). I've also had a small notions box for hand-sewing, perfect to carry with me when I'm making hexies or sewing on binding. I go to sew-ins and quilt retreats quite regularly, so I've had a special box with duplicates of some of my tools so I can grab and go without spending the time pulling everything together.

I realized pretty quickly that this box could do it all. I can take as many, or as few, of the bins as I need. Depending on whether it's a bit of hand-sewing in my sewing room chair, or a 4-day quilt retreat, I can stack whatever boxes and need and it's all ready to go!

The best solutions are different for each of us. It helps, of course, to know whether you work better in a space that is clear of distractions, or if you love having it all out where you can see it. There's an answer out there somewhere! My advice: try lots of different methods, don't be in a big hurry to find the "perfect" method for you, and re-evaluate it periodically to see if it's still working for you. Happy Stitching!"

Sandie Holtman

Saturday, July 2, 2011

Rhonda's Studio


Lets get the ball rolling people...

Our first guest of the series is Rhonda Laws from Quilter in the Gap... A few days back I came across her sewing space on her blog... I loved it so much that I just had to invite her over to share it with you all, and she readily agreed!!!


Thanks Rhonda!!! 


I have always had a fascination with other people's sewing spaces and it started when I started quilting. At that time I was quilting on the kitchen table. I would lug all my supplies out every time I wanted to work on a project and then put it all away when the family needed the space for homework, dinner, or anything else. It was very frustrating and that created my fascination with sewing spaces. This is the way I sewed until just a couple of years ago, when we moved over 500 miles from Michigan to Tennessee. Since my son had just graduated high school and didn't want to leave the area he knew and loved, we were left with extra space. Additionally, we moved into our home sort of "sight unseen". It was quite the adventure. 

outside the house


Due to the general layout of the house and fate, there is the upstairs living space which we use as a family (living room, dining room, kitchen and bedrooms) and a downstairs living space that was destined to be unused (family room, guest room and bathroom). Since we couldn't allow an entire space to go unused, hubby and I decided the downstairs space would be my sewing studio - I was elated!!


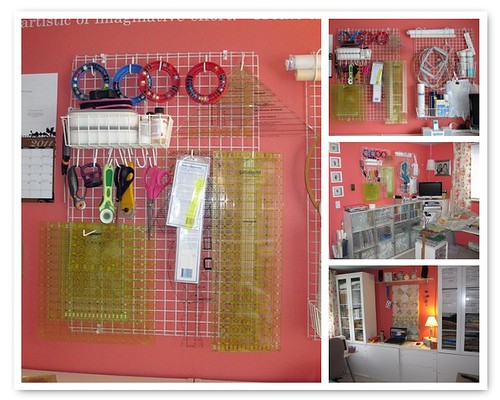
When coming down the stairs you are immediately taken into my studio and this is the view from the bottom of the stairs...


view from bottom of steps


The very large dresser on the right is part of the 70s bedroom suite inherited from my grandmother. It was too large to fit in my bedroom with the quiltless king-size bed and tall dresser so it ended up in my studio. This works out well because it holds all that stuff that you don't want to see. Things like yarn, totes, family pictures that need organized, and dear daughter's scrapbooking supplies she doesn't use. The top of the dress also comes in handy for a couple of reasons. First, as you can see in the photo below, it is a great place to store my hoards of magazines. Also, it is great for all those ongoing projects (and I have many). It is nice to be able to lay them out where I can see them. 


dresser 2


Across from that dresser is a wide plastic two-drawer cart (minus the wheels) with a couple of baskets on top of it and bulletin board hung above it (see picture below). This cart is handy for UFOs (ongoing projects that never made it very far) and wider items like freezer paper. I made the bulletin board out of an old picture frame, a left over piece of pressed cardboard from my home-made design wall, and a piece of fabric. I never really knew what to use it for until I started writing this post. I just decided this would be a great place to put a list of the ongoing projects with information like who it is for, ideas along the way, and deadlines. The baskets hold either precuts (which I like looking at) or larger scraps. 


left side of entrance


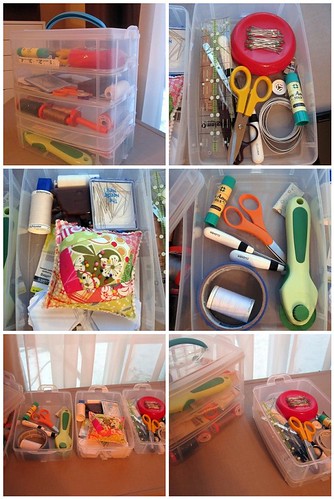
Once inside the actual room on the right I have my cutting station with a standard cutting table from JoAnn's that can be wheeled out if needed. Above that is a peg board with all my cutting mats, rules, rotary cutters, and the like. It has been quite handy. I also keep a small three-drawer plastic desktop box for smaller items needed while cutting. These items include extra blades, calculator, etc. 


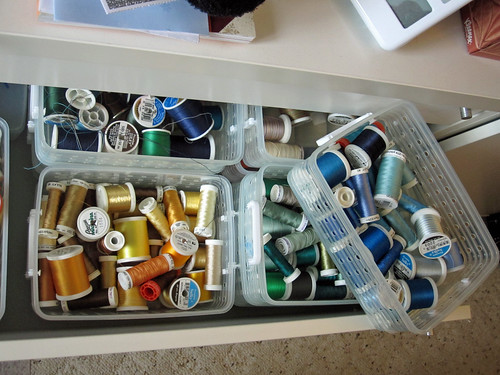
Just to the left of the cutting station is my favorite piece of furniture in my studio - the antique desk. I spent a whopping $20 on that desk just before leaving Michigan - much to my husband's dismay. I store my smaller scraps on top of that desk - sorted by color in antique looking canisters from Wal-Mart. 


cutting space 1

In the corner is an old bookshelf where I store my fabric (over 1/3 yd), bulky items like batting, and books. I store my fabric by wrapping them around pieces of cardboard and then sorting them by color. This, in my opinion, allows me to see all the fabric I have at a glance. After I am done wrapping it I place a piece of paper in it with the measurements on it. This method allows for fabric petting at whim...hehehe.


fabric yardage storage


Below the window is the table with my sewing machine (which I have never named). I love that I can look out the window while sewing. When I have to use my laptop for recording or listening to my podcast(s) I roll my laptop desk over by my machine. On the window sill I have a few pictures of my family and a few mason jars with buttons, beads, and selvages. 


sewing machine space


The left-hand wall is a wood wall placed on the diagonal. It is not my favorite thing to look at so I plan to eventually have it completely covered in design wall. For now it only has one panel on it but I love it none-the-less. Adjacent to that I have my ironing station. My husband and I made the design wall with some pressed cardboard we found. We also made the ironing board cover (so as to enlarge it). Under the large ironing board I have a couple of large baskets for fabric that needs to be put back on the shelves or whatever miscellaneous items might land in them. 


ironing board


All in all I have a wonderful space that I love to be in. Of course there are things I plan on changing and there is always something that needs to be done. Hubby said he hates coming down there because it always means there is a project for him to do. While this may be true, I am not all that keen about him being in there either. 


In summary, my theory in my studio is "if I love it put it where I can see it" and "put it where you use it, allowing for more time to sew". Thanks for visiting my studio today...hope you come again.

Friday, July 1, 2011

Welcome!!!


Welcome all!
Welcome to Sewing Spaces Focus!!!

Starting tomorrow, we will be featuring sewing spaces from across the world, at least, twice a week.
Tuesday and Saturday...

Your space could be just a small table tucked away into the corner of your tiny bedroom or a huge warehouse!
We would love to feature it here...

Come share your space, let others see what you have done and I'm sure they'll be inspired by you...

Email us at 13woodhouseroad[at]gmail[dot]com if you want to be a guest at SSF!

And all those who have already submitted their spaces, go grab the button!


Dont worry if you haven't contributed, we have a button for you too!!!


Also once a week, we will be having a post about your super tips on organizing the sewing spaces...
So share your ideas... We would always love some extra help!

Hop onto the wagon...

Cheers!!!


Template: Blog Designs by Sheila | Artwork: 123RF Stock Photos